WSL2 on Windows: Linux for developers Link to heading

Today, when we talk about desktop and notebook computers, Windows is still the most widely used desktop operating system in the world. That matters for developers: many people work on Windows, ship applications for Windows, test integrations in the Windows ecosystem and, at the same time, need tools that were born first on Linux.
That middle ground is exactly why WSL, the Windows Subsystem for Linux, exists. It lets you run a Linux environment inside Windows, with terminal, packages, commands and a Linux filesystem, without requiring dual boot and without forcing you to manage a traditional virtual machine for each task.
For people building automations, agents, command-line tools, build scripts or applications that need to talk to the Linux world, WSL2 solves a very practical pain: keep Windows as the main workstation, but run Linux runtimes and tools when that makes more sense.
What WSL is Link to heading
WSL is a Windows feature for running Linux distributions, such as Ubuntu, Debian, Kali, openSUSE, Fedora, Arch and others, directly on a Windows machine. In practice, you open the terminal for the chosen distribution and use commands such as bash, grep, sed, awk, git, node, python and many common Linux tools.
The advantage is not to “replace” Windows. The advantage is to combine both environments:
- Windows remains the desktop, with editors, browsers, corporate tools and local integrations;
- Linux becomes the technical environment for terminal work, packages, automation and runtimes that work better in the Linux ecosystem.
This model is comfortable for development because you can edit on Windows and execute on Linux, or work directly inside the Linux filesystem when performance and compatibility matter more.
WSL1 and WSL2, without drama Link to heading
There are two architectures: WSL1 and WSL2.
WSL1 translates Linux calls into Windows calls. WSL2 uses virtualization to run a real Linux kernel inside a lightweight utility VM managed by Windows itself. This difference matters because WSL2 has broader compatibility with Linux system calls and is usually the recommended path for modern tools.
For most current development workflows, especially when you will install agents, runtimes, automation tools, Docker or dependencies closer to real Linux, WSL2 is the natural choice.
How WSL2 works underneath Link to heading
In WSL2, Windows starts a lightweight managed VM. Inside that VM runs a real Linux kernel. Distributions run as isolated environments inside that VM.
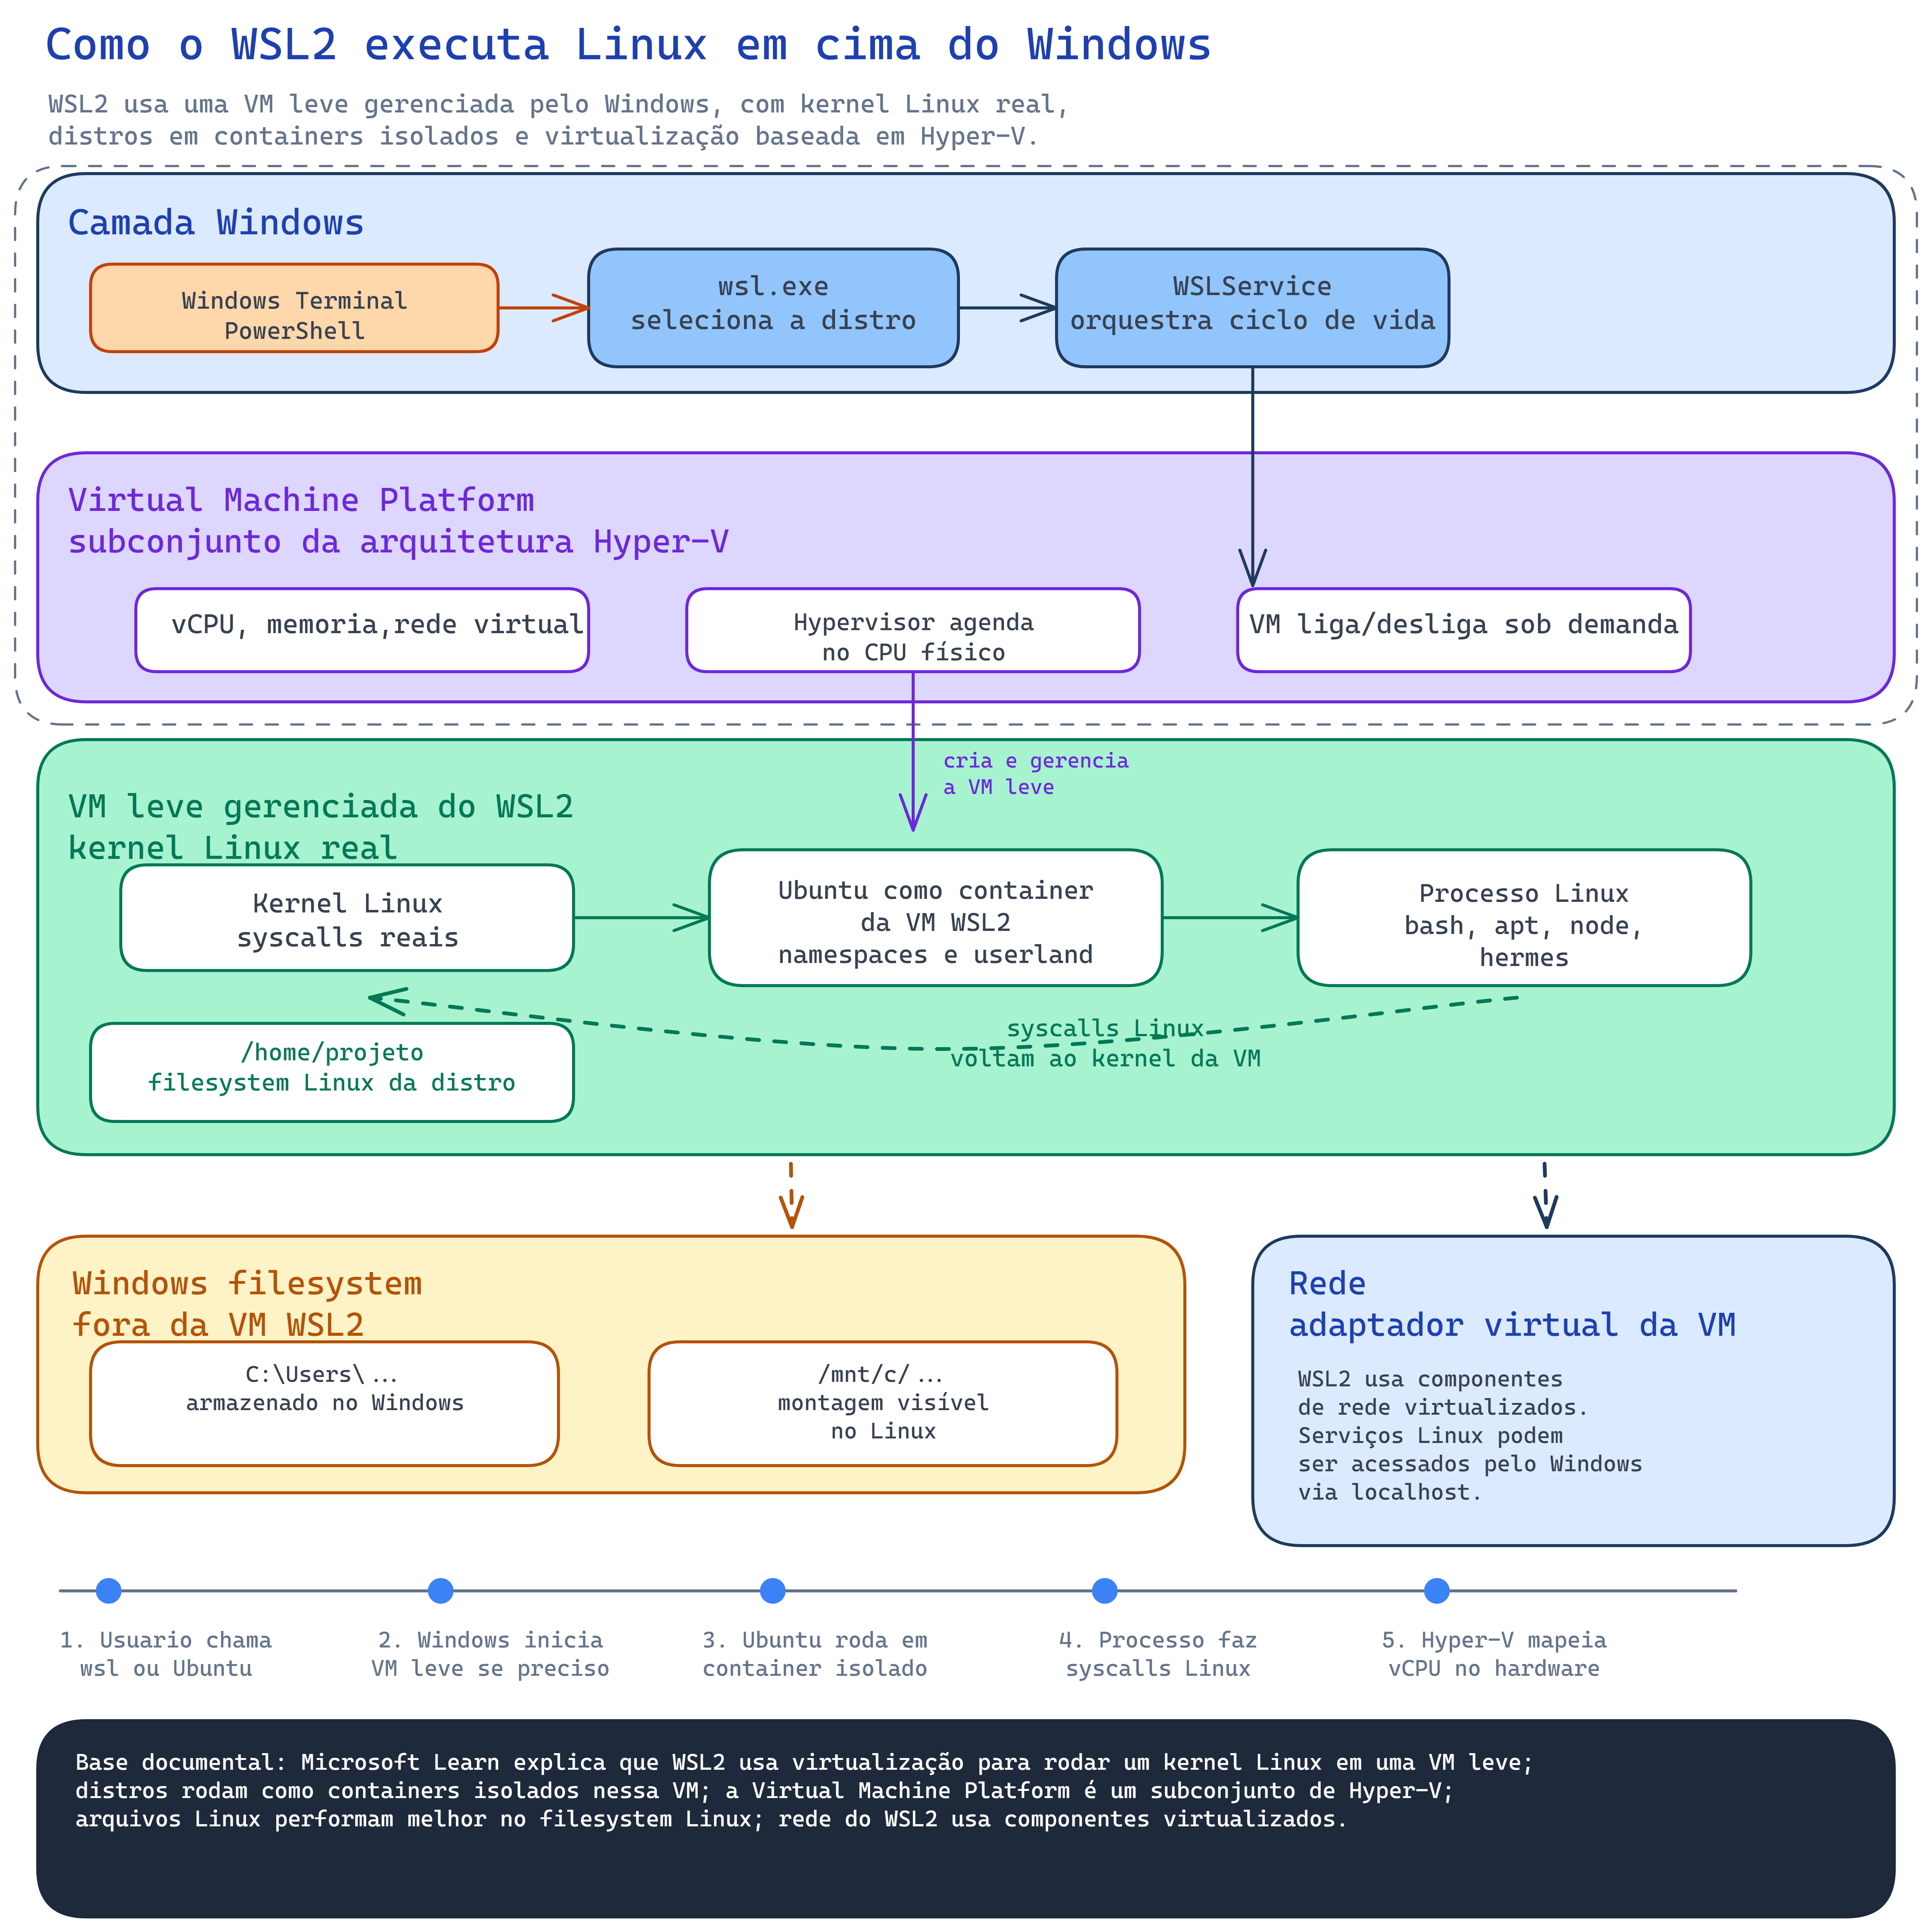
This is not a traditional VM that you create in Hyper-V Manager, choose an ISO for, configure disks for and manage manually. The VM exists, but WSL controls it. For the user, the experience is still opening a Linux distribution in the terminal; for the system, there is a virtualization layer handling the Linux kernel, memory, CPU, networking and isolation.
Under the hood, WSL2 uses the Windows virtualization foundation. Microsoft documents Hyper-V as a type 1 hypervisor-based virtualization technology. In simple terms, the hypervisor runs close to the hardware and coordinates resources such as processor, memory and virtualized devices for isolated environments.
For WSL2, think of the flow like this:
- you call
wslor open a Linux distribution; - Windows selects the distribution;
- the WSL service starts the lightweight VM if it is not running yet;
- the Linux distribution runs inside the managed VM;
- Linux processes call the real Linux kernel;
- the hypervisor schedules CPU and memory on the physical hardware.
The result is a much simpler experience than a manual VM, but with real Linux compatibility underneath.
Files: /home and /mnt/c
Link to heading
One point that avoids a lot of confusion: two file paths live side by side.
Inside the distribution, the main Linux path is under /home/your_user. For projects that will run with Linux tools, this is usually the best place:
/home/your_user/projects/my-api
Windows also appears inside WSL through mounted paths, usually under /mnt/c. For example:
/mnt/c/Users/your_user/Documents
Use /mnt/c when you need to access Windows files. But for Linux projects with many small files, dependencies, node_modules, Python virtual environments or frequent builds, prefer keeping the project under /home. This reduces permission problems and usually improves performance.
Networking and localhost
Link to heading
WSL2 also virtualizes networking. Even so, the day-to-day experience is usually simple: if you start a service inside the distribution listening on localhost, you can usually access it from the Windows browser at http://127.0.0.1:port.
Example: if a Linux application starts on 127.0.0.1:3000 inside the distribution, try opening this in the Windows browser:
http://127.0.0.1:3000
If it does not work, investigate firewall, port, service bind and WSL network mode. But for common local use, the localhost bridge solves most tests.
Before starting: where each command runs Link to heading
This separation prevents the most common mistakes.
- PowerShell as Administrator: install WSL and enable Windows features.
- Normal PowerShell: list distributions, inspect status and restart the WSL VM.
- Linux/WSL distribution: validate the environment and run development tools.
Always check which terminal you are in before copying commands. wsl --install is a Windows command. cat /etc/os-release is a Linux command inside the distribution.
Step 1: install WSL2 Link to heading
Open PowerShell as Administrator and run:
wsl --install
This command enables the required features and installs the default Linux distribution, usually Ubuntu. If Windows asks for a reboot, reboot before continuing.
After rebooting, open the distribution from the Start Menu. On first launch, it may ask you to create a Linux username and password. This password belongs to the Linux environment; it does not need to match your Windows password.
To see which distributions are available, run in normal PowerShell:
wsl --list --online
Common families in this list include:
- Ubuntu: usually the most documented option for development tutorials;
- Debian:
Debian; - Kali:
kali-linux; - openSUSE: Leap or Tumbleweed;
- SUSE Linux Enterprise: Enterprise versions published for WSL;
- AlmaLinux: Enterprise Linux family versions;
- Arch Linux:
archlinux; - Fedora: versions published as
FedoraLinux-*; - Oracle Linux: versions published as
OracleLinux_*; - eLxr:
eLxr.
This list changes over time and varies with the Windows catalog. Treat wsl --list --online as the final source on your machine.
To install a specific distribution, use the name shown in the NAME column:
wsl --install -d <DistributionName>
For example:
wsl --install -d Debian
wsl --install -d kali-linux
If the distro you want does not appear, you can check the Microsoft Store, import an official rootfs with wsl --import, or use a community project with caution after validating provenance, updates and security.
The wsl --import path is more advanced and requires a .tar file with the distribution filesystem:
wsl --import MyDistro C:\WSL\MyDistro C:\path\rootfs.tar --version 2
For most development tutorials, Ubuntu and Debian reduce friction with documentation, packages and examples. But WSL is not limited to them.
Step 2: confirm the distribution is running on WSL2 Link to heading
In normal PowerShell, check installed distributions:
wsl -l -v
The VERSION column should show 2 for the distribution you will use. If it shows 1, set WSL2 as the default for new distributions:
wsl --set-default-version 2
And, if needed, convert an already installed distribution:
wsl --set-version <DistributionName> 2
It is also worth updating WSL:
wsl --update
If you changed global WSL configuration or want to fully restart the Linux environment, use:
wsl --shutdown
Then open the distribution again.
Step 3: open a distribution on Windows Link to heading
You can open a distribution in three simple ways:
- from the Start Menu, searching for the distribution name;
- from Windows Terminal, clicking the arrow next to the current tab and choosing the distribution profile;
- from normal PowerShell, calling the distribution directly:
wsl -d <DistributionName>
Example:
wsl -d Debian
When you are in the right place, the prompt stops looking like PowerShell and starts looking like a Linux terminal, for example:
user@machine:~$
To confirm, run inside the Linux/WSL distribution:
pwd
If the answer starts with /home/..., you are inside the Linux distribution. To exit and return to PowerShell later, use:
exit
From this point on, when a tutorial says “run on Linux”, you can usually run it inside this WSL2 distribution.
Step 4: validate that the distribution is OK Link to heading
After opening the distribution, validate the basics without depending on a specific package manager.
Inside Linux/WSL, check which distribution is running:
cat /etc/os-release
Check the Linux kernel:
uname -a
Check the current user:
whoami
Check the current directory:
pwd
In normal PowerShell, check whether the distribution is registered and which WSL version it uses:
wsl -l -v
And see which distributions are running at that moment:
wsl --list --running
If these commands respond without errors, the distribution is functional. From there, each tutorial can ask for packages according to the distribution family: apt on Debian/Ubuntu, dnf on Fedora, zypper on openSUSE, pacman on Arch, and so on.
Step 5: control whether WSL starts with Windows Link to heading
A WSL distribution should not start by itself just because Windows booted. In general, it starts when something calls wsl.exe: Windows Terminal, Docker Desktop, a scheduled task, a service, a startup script or some development application.
To see what is running now, use:
wsl --list --running
To stop a specific distribution:
wsl --terminate <DistributionName>
To stop the whole WSL2 VM and all distributions:
wsl --shutdown
Make a distribution start with Windows Link to heading
If you want a distribution or a service inside it to start with Windows, use a Windows scheduled task calling wsl.exe.
Simple example to start the distribution at logon:
schtasks /Create /TN "Start WSL" /SC ONLOGON /TR "wsl.exe -d <DistributionName>" /F
To start a specific command inside the distribution:
schtasks /Create /TN "Start WSL service" /SC ONLOGON /TR "wsl.exe -d <DistributionName> --exec bash -lc 'command-here'" /F
Use this path when there is a real reason: local database, development service, agent, automation or daemon that must exist as soon as you log in to Windows.
Prevent a distribution from starting with Windows Link to heading
If WSL starts together with Windows and you do not want that, find who is calling wsl.exe.
Check related scheduled tasks:
schtasks /Query /FO LIST | findstr /I "wsl"
If you created a task like the previous example, delete it:
schtasks /Delete /TN "Start WSL" /F
Also check Windows startup apps, Docker Desktop, scripts in shell:startup and services that may depend on WSL. After removing the trigger, shut WSL down:
wsl --shutdown
Important detail: enabling systemd inside a distribution makes Linux services start when that distribution starts. By itself, it does not mean the distribution will start at Windows boot.
Step 6: limit WSL2 memory Link to heading
This step is optional, but useful on machines where WSL competes with browser, editor, local databases and other heavy tools.
In normal PowerShell, open the .wslconfig file in your Windows profile:
notepad $env:USERPROFILE\.wslconfig
If the file does not exist, Notepad may ask whether you want to create it. Create it and add, for example:
[wsl2]
memory=4GB
processors=4
This file lives on Windows, outside the Linux distributions. It configures the VM that powers WSL2 distributions. memory=4GB limits the maximum memory used by the WSL2 VM. processors=4 limits how many logical processors it can use.
After saving, apply the configuration by shutting WSL down:
wsl --shutdown
Open the distribution again. The configuration takes effect on the next WSL2 VM startup.
Step 7: useful maintenance commands Link to heading
General WSL status:
wsl --status
WSL and component versions:
wsl --version
List installed distributions:
wsl -l -v
Shut down all distributions and the lightweight WSL2 VM:
wsl --shutdown
List only running distributions:
wsl --list --running
Terminate only one distribution:
wsl --terminate <DistributionName>
Set a default distribution:
wsl --set-default <DistributionName>
Open the default distribution:
wsl
Open a specific distribution:
wsl -d <DistributionName>
Open the distribution directly in the home directory:
wsl ~ -d <DistributionName>
Run a command without entering the interactive shell:
wsl -d <DistributionName> --exec uname -a
Import a distribution from a rootfs:
wsl --import <DistributionName> <InstallationDirectory> <RootfsTarFile> --version 2
Remove a registered distribution, deleting its Linux filesystem:
wsl --unregister <DistributionName>
Use wsl --unregister very carefully. It removes the distribution and its Linux data.
Final checklist Link to heading
Before moving to more specific tools, confirm:
wsl -l -vshows the chosen distribution inVERSION 2;- you can open the distribution from the Start Menu or Windows Terminal;
cat /etc/os-releaseidentifies the distribution inside WSL;uname -ashows a Linux kernel;pwdinside the distribution shows a Linux path;wsl --list --runningshows only what is active at that moment;- if you created
.wslconfig, you ranwsl --shutdownafterwards; - your main Linux projects live under
/home/..., not/mnt/c/..., when performance matters; - local services in the distribution can be tested from the Windows browser through
localhost; - if WSL starts with Windows, you know which application, scheduled task or service is calling
wsl.exe.
With that ready, Windows remains your workstation and WSL2 becomes the Linux runtime for installing modern tools with less friction.
Next step Link to heading
With a distribution working in WSL2, you can install development tools directly in it: Node.js, Python, Docker, local databases, CLIs, agents and automations.
For Hermes Agent, the path continues in the next tutorial:
Installing Hermes Agent on Windows with WSL2 and Ubuntu
References Link to heading
- Microsoft Learn - What is the Windows Subsystem for Linux?
- Microsoft Learn - How to install Linux on Windows with WSL
- Microsoft Learn - Basic commands for WSL
- Microsoft Learn - Comparing WSL versions
- Microsoft Learn - Advanced settings configuration in WSL
- Microsoft Learn - Hyper-V virtualization in Windows Server and Windows
- Microsoft Learn - Hyper-V architecture
- StatCounter Global Stats - Desktop Operating System Market Share Worldwide