Installing Hermes Agent on Windows with WSL2 and Ubuntu Link to heading

Hermes Agent is one of those tools that sits between a personal assistant, a technical agent and an automation lab. It chats, uses tools, keeps sessions, works with different model providers and can grow into more advanced flows with gateway, skills, automations and integrations.
This tutorial assumes you already have Ubuntu running on WSL2. The choice of Ubuntu here is pragmatic: it is one of the most widely used Linux distributions by developers, has abundant documentation, good package availability and appears frequently in server environments too. For an installation tutorial, that reduces friction and makes it easier to compare errors, commands and dependencies with examples from official documentation and the community.
If that base is not ready yet, start with the WSL2 installation and validation post:
WSL2 on Windows: Linux for developers
That separation keeps each thing in its place. The WSL2 post explains how Linux runs on Windows, how to open Ubuntu, where /home and /mnt/c live and how to limit memory. Here the focus is the next step: install Hermes inside Ubuntu/WSL2, authenticate with the ChatGPT/Codex account and validate CLI, TUI, dashboard and Telegram.
The main trap still applies: on Windows, the right path is not trying to install Hermes directly in PowerShell as if it were a native application. The official Hermes documentation states that native Windows is not supported for this flow; the recommended path is to run Hermes inside a Linux distribution, such as Ubuntu on WSL2.
If you are already on Linux outside Windows, the path is shorter. You can start from the Hermes installation step after ensuring curl and git are available. This tends to work on most common Linux distributions as long as the environment has the prerequisites expected by the installer.
We will prepare Ubuntu, run the official Hermes Agent installer and, at the end, configure login using your ChatGPT/Codex account through the OpenAI Codex provider.
When to think about a VPS Link to heading
WSL2 is excellent for local development, labs, tests and automations that depend on your computer being turned on. It is not the best answer for everything.
If your Hermes automation must stay active 24/7, answer messages without depending on your notebook, run scheduled tasks with high availability or act as a persistent agent, then it is worth studying a dedicated VPS. The local WSL2 path is great for learning, validating and developing; the VPS enters when the need grows and the environment must stay always online.
Before starting: where each command runs Link to heading
This is the most important part of the tutorial. If you copy the right command into the wrong terminal, the error may look more mysterious than it really is.
Use this rule:
- PowerShell as Administrator: use it to install or update WSL.
- Normal PowerShell: use it to check installed distributions and WSL version.
- Ubuntu/WSL: use it to install and run Hermes.
The Hermes command with curl must run inside Ubuntu/WSL, not in native PowerShell.
Prerequisite: Ubuntu on WSL2 Link to heading
Before starting, confirm in normal PowerShell:
wsl -l -v
The VERSION column must show 2 for Ubuntu. If it shows 1, solve that first with the WSL2 guide. Hermes may find parts of the path in other environments, but this tutorial was written for Ubuntu on WSL2.
You also need:
- internet connection;
- access to your ChatGPT/Codex account if you intend to use the OpenAI Codex provider;
sudopermission inside Ubuntu;- a few minutes for the installer to download dependencies.
Hermes can also be configured with other providers, such as OpenRouter, Nous Portal, Anthropic, GitHub Copilot and custom endpoints. Here the focus is the requested path: Hermes on Windows through WSL2 and login with the account used in Codex/ChatGPT.
Step 1: prepare Ubuntu Link to heading
Now open Ubuntu/WSL. From here on, commands are Linux commands.
You can do this in three simple ways:
- from the Windows Start Menu, searching for
Ubuntu; - from Windows Terminal, clicking the arrow next to the current tab and choosing the
Ubuntuprofile; - from normal PowerShell, calling the distribution directly:
wsl -d Ubuntu
When you are in the right place, the prompt stops looking like PowerShell and starts looking like a Linux terminal, for example:
user@machine:~$
To confirm, run:
pwd
If the answer starts with /home/..., you are inside Ubuntu. To exit and return to PowerShell later, use exit.
Update the package list:
sudo apt update
Install curl and git:
sudo apt install -y curl git
Confirm Git:
git --version
Confirm the distribution too:
lsb_release -a
Confirm Python, pip, venv and uv Link to heading
Hermes is installed as a Python application. In a common Ubuntu installation, python3 is usually available, but this is not absolute in minimal images, containers, lean VPS setups or very clean WSL installations. Also, even when Python exists, pip and the venv module may not be installed.
Check first:
python3 --version
python3 -m pip --version
If any of these commands fail, install the Python base on Ubuntu:
sudo apt update
sudo apt install -y python3 python3-pip python3-venv
Then validate again:
python3 --version
python3 -m pip --version
python3-venv deserves a quick explanation. A Python virtual environment is an isolated folder with its own Python interpreter and dependencies. It avoids installing Hermes packages directly into the system Python. This matters because agents like Hermes pull many libraries, dashboard extras, auxiliary tools and specific versions. Keeping everything in a venv reduces conflicts with Ubuntu packages, avoids breaking system tools and makes the installation easier to update or remove.
The official Hermes installer usually creates this virtual environment automatically inside the Hermes directory. You only need to touch it manually when installing extras, such as web and pty, or when debugging an incomplete installation.
Also validate uv, the modern package manager used in the Python ecosystem to create environments, install dependencies and work with packages faster than traditional pip:
uv --version
If uv does not exist yet, install it through Astral’s official installer inside Ubuntu/WSL:
curl -LsSf https://astral.sh/uv/install.sh | sh
Close and reopen the Ubuntu terminal or load the current session environment:
source "$HOME/.local/bin/env"
And confirm:
uv --version
From here on, when the tutorial says “run on Linux”, understand it as “run inside this Ubuntu on WSL2”.
The Hermes documentation states that Git is the main manual prerequisite. The official installer handles the rest of the default path, including Node.js, repository clone, virtual environment and global hermes command. Even so, validating python3, pip, venv and uv beforehand reduces noise when installing extras or investigating problems. Some auxiliary resources, such as ripgrep, ffmpeg and complete browser dependencies, may require sudo on Ubuntu.
Step 2: install Hermes Agent Link to heading
Still inside Ubuntu/WSL, run the official installer:
curl -fsSL https://raw.githubusercontent.com/NousResearch/hermes-agent/main/scripts/install.sh | bash
In a normal terminal, this is the simplest path. If you are automating installation in a headless environment, without human interaction, the installer may wait for a prompt. In that case, one alternative is to download the script, run it without the initial assistant and leave configuration for hermes model:
curl -fsSL https://raw.githubusercontent.com/NousResearch/hermes-agent/main/scripts/install.sh -o /tmp/hermes-install.sh
chmod +x /tmp/hermes-install.sh
setsid bash /tmp/hermes-install.sh --skip-setup < /dev/null
Use this alternative only when it makes sense. For most users, the official curl ... | bash command is enough.
When it finishes, reload the shell:
source ~/.bashrc
If you use zsh, the equivalent is:
source ~/.zshrc
Now check whether the command is available:
hermes --version
If the terminal says hermes was not found, close and reopen Ubuntu. If it still fails, check whether ~/.local/bin is in PATH, because the per-user installer usually creates the command shortcut there.
At the end of the installation, Hermes may offer a configuration assistant. For this tutorial, do not try to configure everything at once. First validate that the command exists; then use hermes model to configure the OpenAI Codex provider. If you already installed it and want to return to the assistant later, the command is:
hermes setup
For existing installations, there is also a quick mode that asks only for missing or unconfigured items:
hermes setup --quick
This mode is useful for completing an installation, but it does not replace the main flow of this post: hermes model, choose OpenAI Codex and finish login through the browser.
Optional: install auxiliary resources Link to heading
Basic Hermes does not need all of this to chat. After hermes --version works, you can already move on to Codex login. Even so, some extras make the environment more complete.
ripgrep: fast file search
Link to heading
ripgrep, called through the rg command, provides fast search in code and files. Agents that read large projects benefit from it because searching with rg is much more efficient than falling back to grep.
If it is not installed, Hermes still works; hermes doctor only warns that it will use a fallback.
Install it in Ubuntu/WSL:
sudo apt update
sudo apt install -y ripgrep
Validate:
rg --version
ffmpeg: audio, video and media conversions
Link to heading
ffmpeg is used for media tasks: converting audio, preparing files for transcription, working with video and supporting tools that depend on multimedia processing. For text chat and OpenAI Codex login, it is not mandatory.
Install:
sudo apt install -y ffmpeg
Validate:
ffmpeg -version
Browser/CDP: browser automation Link to heading
Browser/CDP means browser automation through the Chrome DevTools Protocol. It is the kind of resource used when an agent needs to open pages, click elements, take screenshots, test web flows or inspect an application in the browser.
This is useful for advanced automations, but it is not required to install Hermes, log in with Codex, use hermes chat or configure Telegram.
To install browser dependencies in the Hermes environment, run in Ubuntu/WSL:
cd ~/.hermes/hermes-agent
npx playwright install --with-deps chromium
This command may ask for sudo, because some dependencies are Linux system packages. Then validate:
hermes doctor
If doctor still shows browser or browser-cdp as pending, treat it as a tool-specific pending item, not as a failure of the main installation.
Step 3: log in with the ChatGPT/Codex account Link to heading
After the binary exists, you need to choose the model provider. To use the Codex/ChatGPT account, the documented Hermes path is to configure the OpenAI Codex provider through the interactive command:
hermes model
In the menu, look for OpenAI Codex. Do not choose by option number without reading the screen, because interactive menus change over time.
When you select OpenAI Codex, Hermes should start an OAuth/device code authentication flow. This is where many people get lost, so think of it as a bridge between the Linux terminal and the browser:
- keep the terminal open;
- Hermes shows an authentication URL in the terminal, usually containing
/deviceor pointing to an OpenAI activation page; - together with the URL, the terminal shows a short confirmation code;
- open that URL in the Windows browser. In Windows Terminal,
Ctrl+clickoften works; if not, copy and paste the URL manually; - on the OpenAI site, enter the code shown in the terminal when the page asks;
- sign in with the same OpenAI/ChatGPT account you use in Codex;
- authorize access;
- return to the terminal and wait for Hermes to finish configuration.
Do not close the terminal in the middle of this process. It waits for browser confirmation to save local authentication.
Do not paste your account password into the terminal. The correct flow happens through the browser, with account authorization.
After that, run:
hermes status
status shows the current agent state: Hermes project directory, active model, selected provider, configured authentications, messaging platforms, gateway and sessions. For this tutorial, the most important point is confirming that the provider appears as OpenAI Codex and that authentication is marked as logged in.
Then run:
hermes doctor
doctor is the diagnostic command. It checks dependencies, configuration files, authentications, external tools, toolset availability and optional pending items. In short: status answers “how is Hermes configured right now?”; doctor answers “what is missing or may break?”.
Important note: Codex/ChatGPT is not the same thing as an OpenAI API key Link to heading
This is a common source of confusion.
Logging into Hermes through the OpenAI Codex provider uses your ChatGPT/Codex account through OAuth/device code, as documented by Hermes. This is different from configuring an OPENAI_API_KEY.
OpenAI itself separates ChatGPT and API Platform: ChatGPT subscription and API billing/usage are managed separately. The traditional API uses an API key and usage-based billing in the developer platform. So, if you have ChatGPT Plus, Pro, Business or Codex access, that does not automatically mean you configured an API key in Hermes.
For this tutorial, the main path is:
hermes model -> OpenAI Codex -> browser login
The API key path is another flow and should only be used if you really want to configure a provider based on a key or an OpenAI-compatible endpoint.
Why use OpenAI Codex instead of Claude Code/Anthropic here Link to heading
This is not criticism of Anthropic model quality. Claude and Claude Code are excellent development tools. The point of this tutorial is more pragmatic: use the most direct, stable and documented path for Hermes on Windows/WSL2.
Claude Code should not be treated as “a Claude login any tool can reuse”. It is Anthropic’s official agent, with its own client, credentials and rules.
The official Claude Code legal/compliance documentation makes this boundary clearer: Claude Code/Claude.ai OAuth is for Free, Pro, Max, Team and Enterprise subscribers using Claude Code and Anthropic’s native apps. For developers creating products, services or external tools, the supported path is using a Claude Console API key or a compatible cloud provider such as Bedrock, Vertex or Microsoft Foundry. Anthropic also states that third parties may not offer Claude.ai login nor route calls through users’ Free/Pro/Max credentials, and reserves the right to enforce those restrictions.
So the correct sentence is not “Anthropic banned every third-party tool”. The precise reading is: Anthropic restricts the use of Claude.ai credentials and subscriptions by external tools; for third-party integrations, the supported path is an API key or authorized cloud provider.
That caution became more visible after the incident with third-party tools. In January 2026, public issues in projects such as OpenClaw and OpenCode recorded that OAuth tokens from Claude Code began being rejected outside the authorized client. The observed error message was:
This credential is only authorized for use with Claude Code and cannot be used for other API requests.
In OpenClaw, the public issue describes OAuth tokens synchronized from Claude Code no longer working for external calls. In OpenCode, a similar issue asked the tool to detect Claude Code-specific credentials and guide the user to provide a standard Anthropic API key. In April 2026, reports also described a broader change: Claude subscriptions would stop covering certain uses in external tools such as OpenClaw, pushing those flows toward API key or extra usage packages. That reporting is journalistic evidence; for the tutorial, the official basis is Anthropic’s own legal/compliance rule about credentials and third parties.
In other words: the problem was not “Claude is bad”; the problem was a Claude Code credential or Claude.ai subscription being used outside the supported scope for that tool.
In Hermes, the documentation also signals an important provider difference. The OpenAI Codex provider appears as a flow through hermes model, with OAuth/device code from the ChatGPT/Codex account and credentials saved by Hermes. The Anthropic provider has more conditional paths: Anthropic API key or OAuth tied to Claude Max with extra credits. There are also issues in the Hermes repository reporting difficulties in the Anthropic OAuth path, such as subscription routing, old credentials, “extra usage” billing and differences between what works in official Claude Code and what works in an external harness such as Hermes.
For this tutorial, the recommended path is therefore:
Hermes + OpenAI Codex + ChatGPT/Codex login
Besides being simpler for people already using Codex, this path is not a weak plan B. In April 2026, OpenAI presented GPT-5.5 as its strongest model for real computer work, with especially strong gains in agentic programming, tool use, ambiguity navigation and long tasks. In the official announcement, OpenAI describes GPT-5.5 as capable of writing and debugging code, researching, analyzing data, creating documents and spreadsheets, operating software and moving across tools until a task is complete.
For development, the key point is Codex. OpenAI says GPT-5.5 is its strongest model for agentic coding up to that point, especially in complex terminal workflows, real issue resolution, refactoring, debugging, tests and validation. The announcement also says those capabilities appear especially clearly in Codex, where the model can take on engineering work from implementation and refactoring to debugging, testing and validation. In Codex, GPT-5.5 was announced for Plus, Pro, Business, Enterprise, Edu and Go plans, with a 400k token context window, subject to plan and account availability.
That is exactly the kind of scenario where Hermes shines: CLI, TUI, dashboard, gateway, skills, persistent sessions and tool execution. If Hermes is authenticated with the OpenAI Codex provider and your account has access to GPT-5.5, you are not just “using OpenAI because it is easier”; you are using a frontier model for complex tasks in a harness designed to orchestrate tools, context and automation.
If you want to use Claude in Hermes, use an explicit and supported path: ANTHROPIC_API_KEY, extra credits when applicable, another documented provider, or an advanced ACP/ACPX layer when the goal is to orchestrate native tools such as Codex and Claude Code. That topic belongs in the gateway, security and interoperability post. For installing, validating and getting a stable first experience on Windows with WSL2, OpenAI Codex is the most predictable path.
Security note: the ~/.hermes folder
Link to heading
Hermes keeps much of the agent’s operational life inside ~/.hermes. In the validated installation, this folder contained configuration, .env, local authentication, logs, sessions, skills, memory, state database and the Hermes Agent checkout itself.
That is useful for troubleshooting, backup and understanding the environment, but it also requires care. Do not publish ~/.hermes, do not put that folder in Git, do not copy logs with tokens into a post and do not delete everything impulsively before understanding the impact. If you need to investigate login, gateway, dashboard or memory problems, treat ~/.hermes as a sensitive folder.
Step 4: call the Hermes CLI Link to heading
After configuring the provider, you can call Hermes in different ways inside Ubuntu/WSL.
To open the default interactive experience:
hermes
To open the modern TUI, when available in the installed version:
hermes --tui
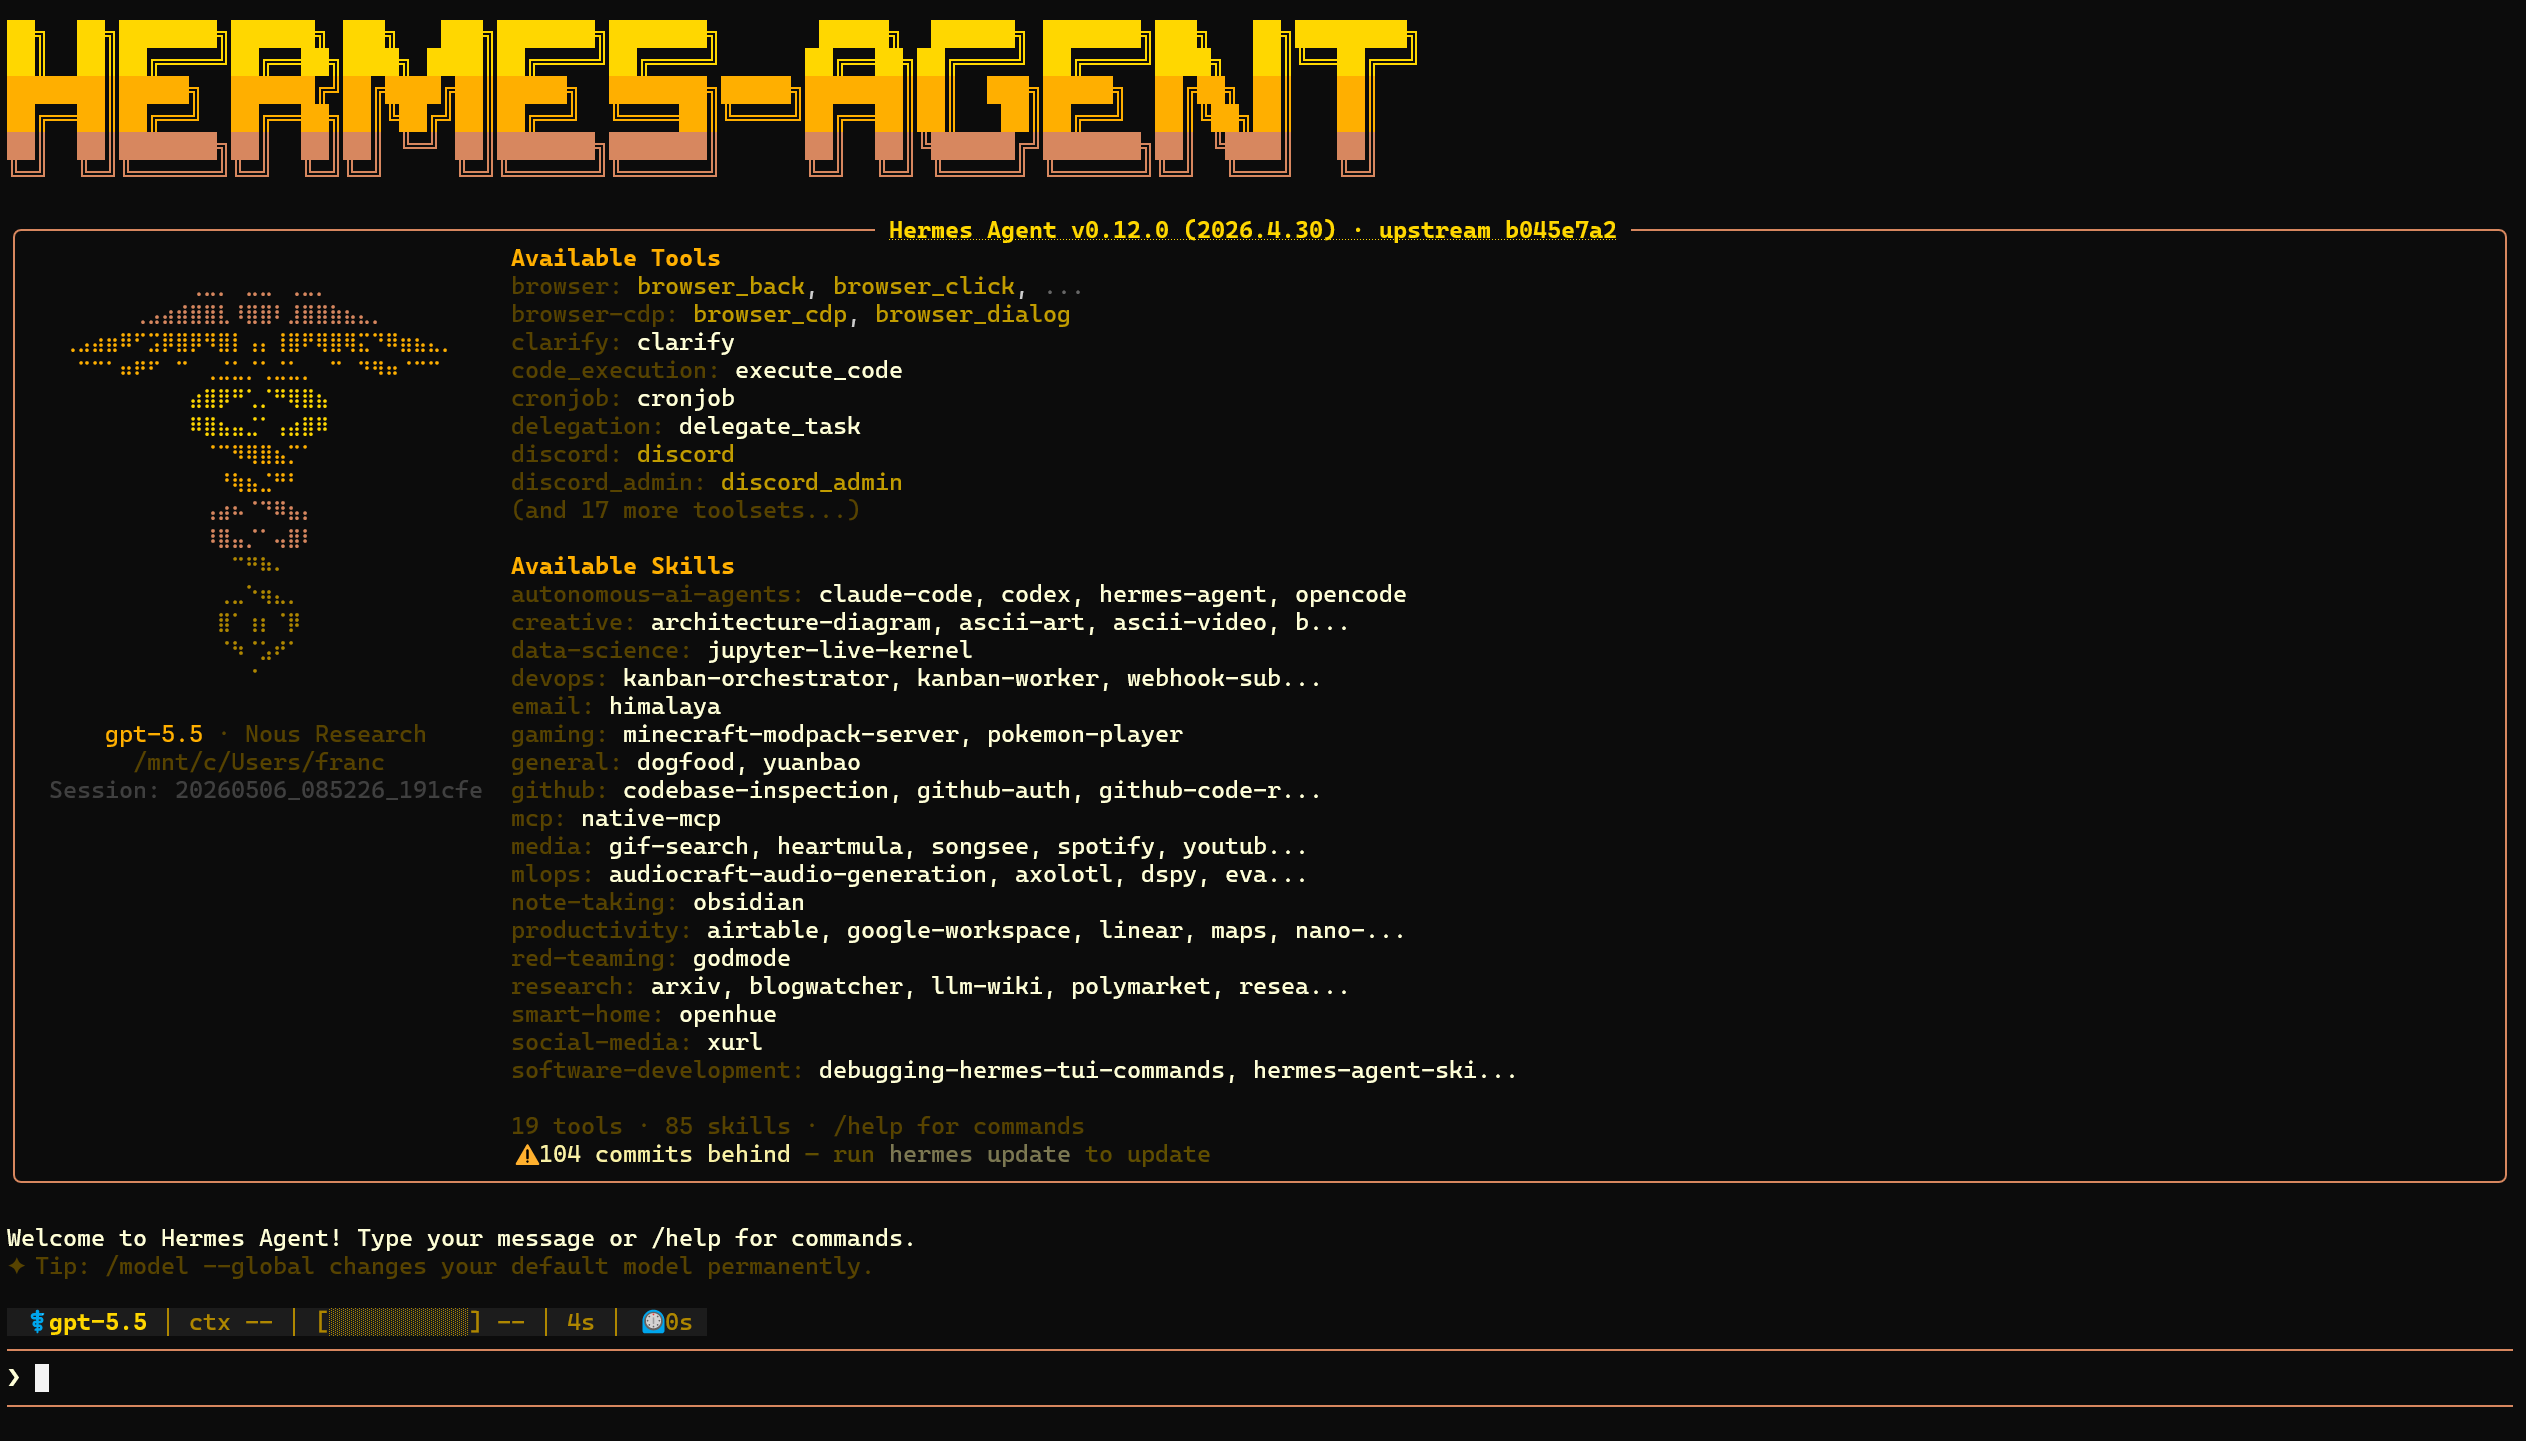
The TUI is a full-screen terminal interface. The exact appearance may change depending on Hermes version, terminal size and theme, but the idea is this: a Hermes banner, provider/model summary, list of available tools and skills and, at the bottom, the prompt to chat or use commands such as /help.
To send a single question and return to the terminal:
hermes chat -q "Explain in one sentence what Hermes Agent is."
To force a specific provider in that call, use --provider. For example, after configuring OpenAI Codex:
hermes chat --provider openai-codex -q "Answer using the Codex provider."
You can also choose model, toolsets and skills at call time:
hermes chat --model "anthropic/claude-sonnet-4"
hermes chat --toolsets "web,terminal,skills"
hermes chat -s github-pr-workflow -q "Open a review checklist for this project."
Important detail: hermes model is the complete provider configuration assistant, executed outside a session. /model, typed inside an active Hermes conversation, only switches among providers and models that you already configured. If you need to add OpenAI Codex, OAuth, API key or a new endpoint, leave the session and run:
hermes model
Step 5: test a real chat Link to heading
With the provider configured, test interactive mode:
hermes chat
Type something short, simple and verifiable:
Answer in one sentence: is it working?
You can also run a direct test without opening an interactive conversation:
hermes chat -q "Answer in one sentence: is it working?"
If you prefer the classic Hermes interface, the documentation also shows:
hermes
The success criterion is simple: Hermes should show the selected provider/model, answer without errors and keep the conversation working for more than one turn.
In the validated installation, after login through hermes model, the real validation looked like this:
hermes status
Important excerpt:
Model:        gpt-5.5
Provider:     OpenAI Codex
OpenAI Codex  ✓ logged in
A direct chat was also validated:
hermes chat -q "Answer exactly: OK CODEX"
Expected answer:
OK CODEX
At this point, you can say installation, Codex login and basic inference are working.
Step 6: install and open the dashboard with chat Link to heading
Besides CLI and terminal TUI, Hermes also has a local web dashboard. It helps manage configuration, sessions, keys, logs, skills and, in recent versions, open a Chat tab in the browser.
The dashboard should not be treated as a public website. By default, run it on 127.0.0.1, only on your machine. Avoid exposing it with --host 0.0.0.0 or --insecure, because the dashboard can handle sensitive configuration.
Install dashboard extras Link to heading
The Hermes documentation separates the dashboard into optional extras. In pip installations, the documented command is:
pip install "hermes-agent[web,pty]"
This command assumes you know which Python you are installing into. If Ubuntu complains about an externally managed environment, do not force global installation with --break-system-packages. The better path is to install the extras inside Hermes’ own virtual environment.
The web extra installs the HTTP part of the dashboard, such as FastAPI and Uvicorn. The pty extra matters for the new chat because it allows embedding a terminal/TUI session inside the browser.
In this tutorial’s path, installed by the official script inside ~/.hermes/hermes-agent, these extras may already be present. Validate first:
hermes dashboard --help
If the command exists and shows options such as --port, --host, --no-open and --tui, the dashboard is available.
If your installation complains about missing dependencies, install the extras inside the Hermes checkout:
cd ~/.hermes/hermes-agent
uv pip install -e ".[web,pty]" --python venv/bin/python
Here uv pip install uses the pip-compatible interface but writes dependencies into the Python indicated by --python venv/bin/python. In other words: the extras go into the Hermes virtual environment, not into Ubuntu’s global Python.
Then confirm again:
hermes dashboard --help
Open the dashboard Link to heading
To open the local dashboard on the default port 9119:
hermes dashboard
If you do not want it to try opening the browser automatically:
hermes dashboard --no-open
On Windows, open this in the browser:
http://127.0.0.1:9119
If the port is busy, choose another one:
hermes dashboard --port 9120 --no-open
And open:
http://127.0.0.1:9120
To see whether a dashboard is running:
hermes dashboard --status
To stop it:
hermes dashboard --stop
Enable the new dashboard chat Link to heading
The embedded dashboard chat is the new resource that places the hermes --tui experience inside the browser. In the validated version, it is enabled with --tui:
hermes dashboard --tui
Or, if you want to combine it with port and manual opening:
hermes dashboard --tui --port 9120 --no-open
You can also enable it through an environment variable:
HERMES_DASHBOARD_TUI=1 hermes dashboard --no-open
After that, open the dashboard URL and enter the Chat tab. You should see an interface like this:
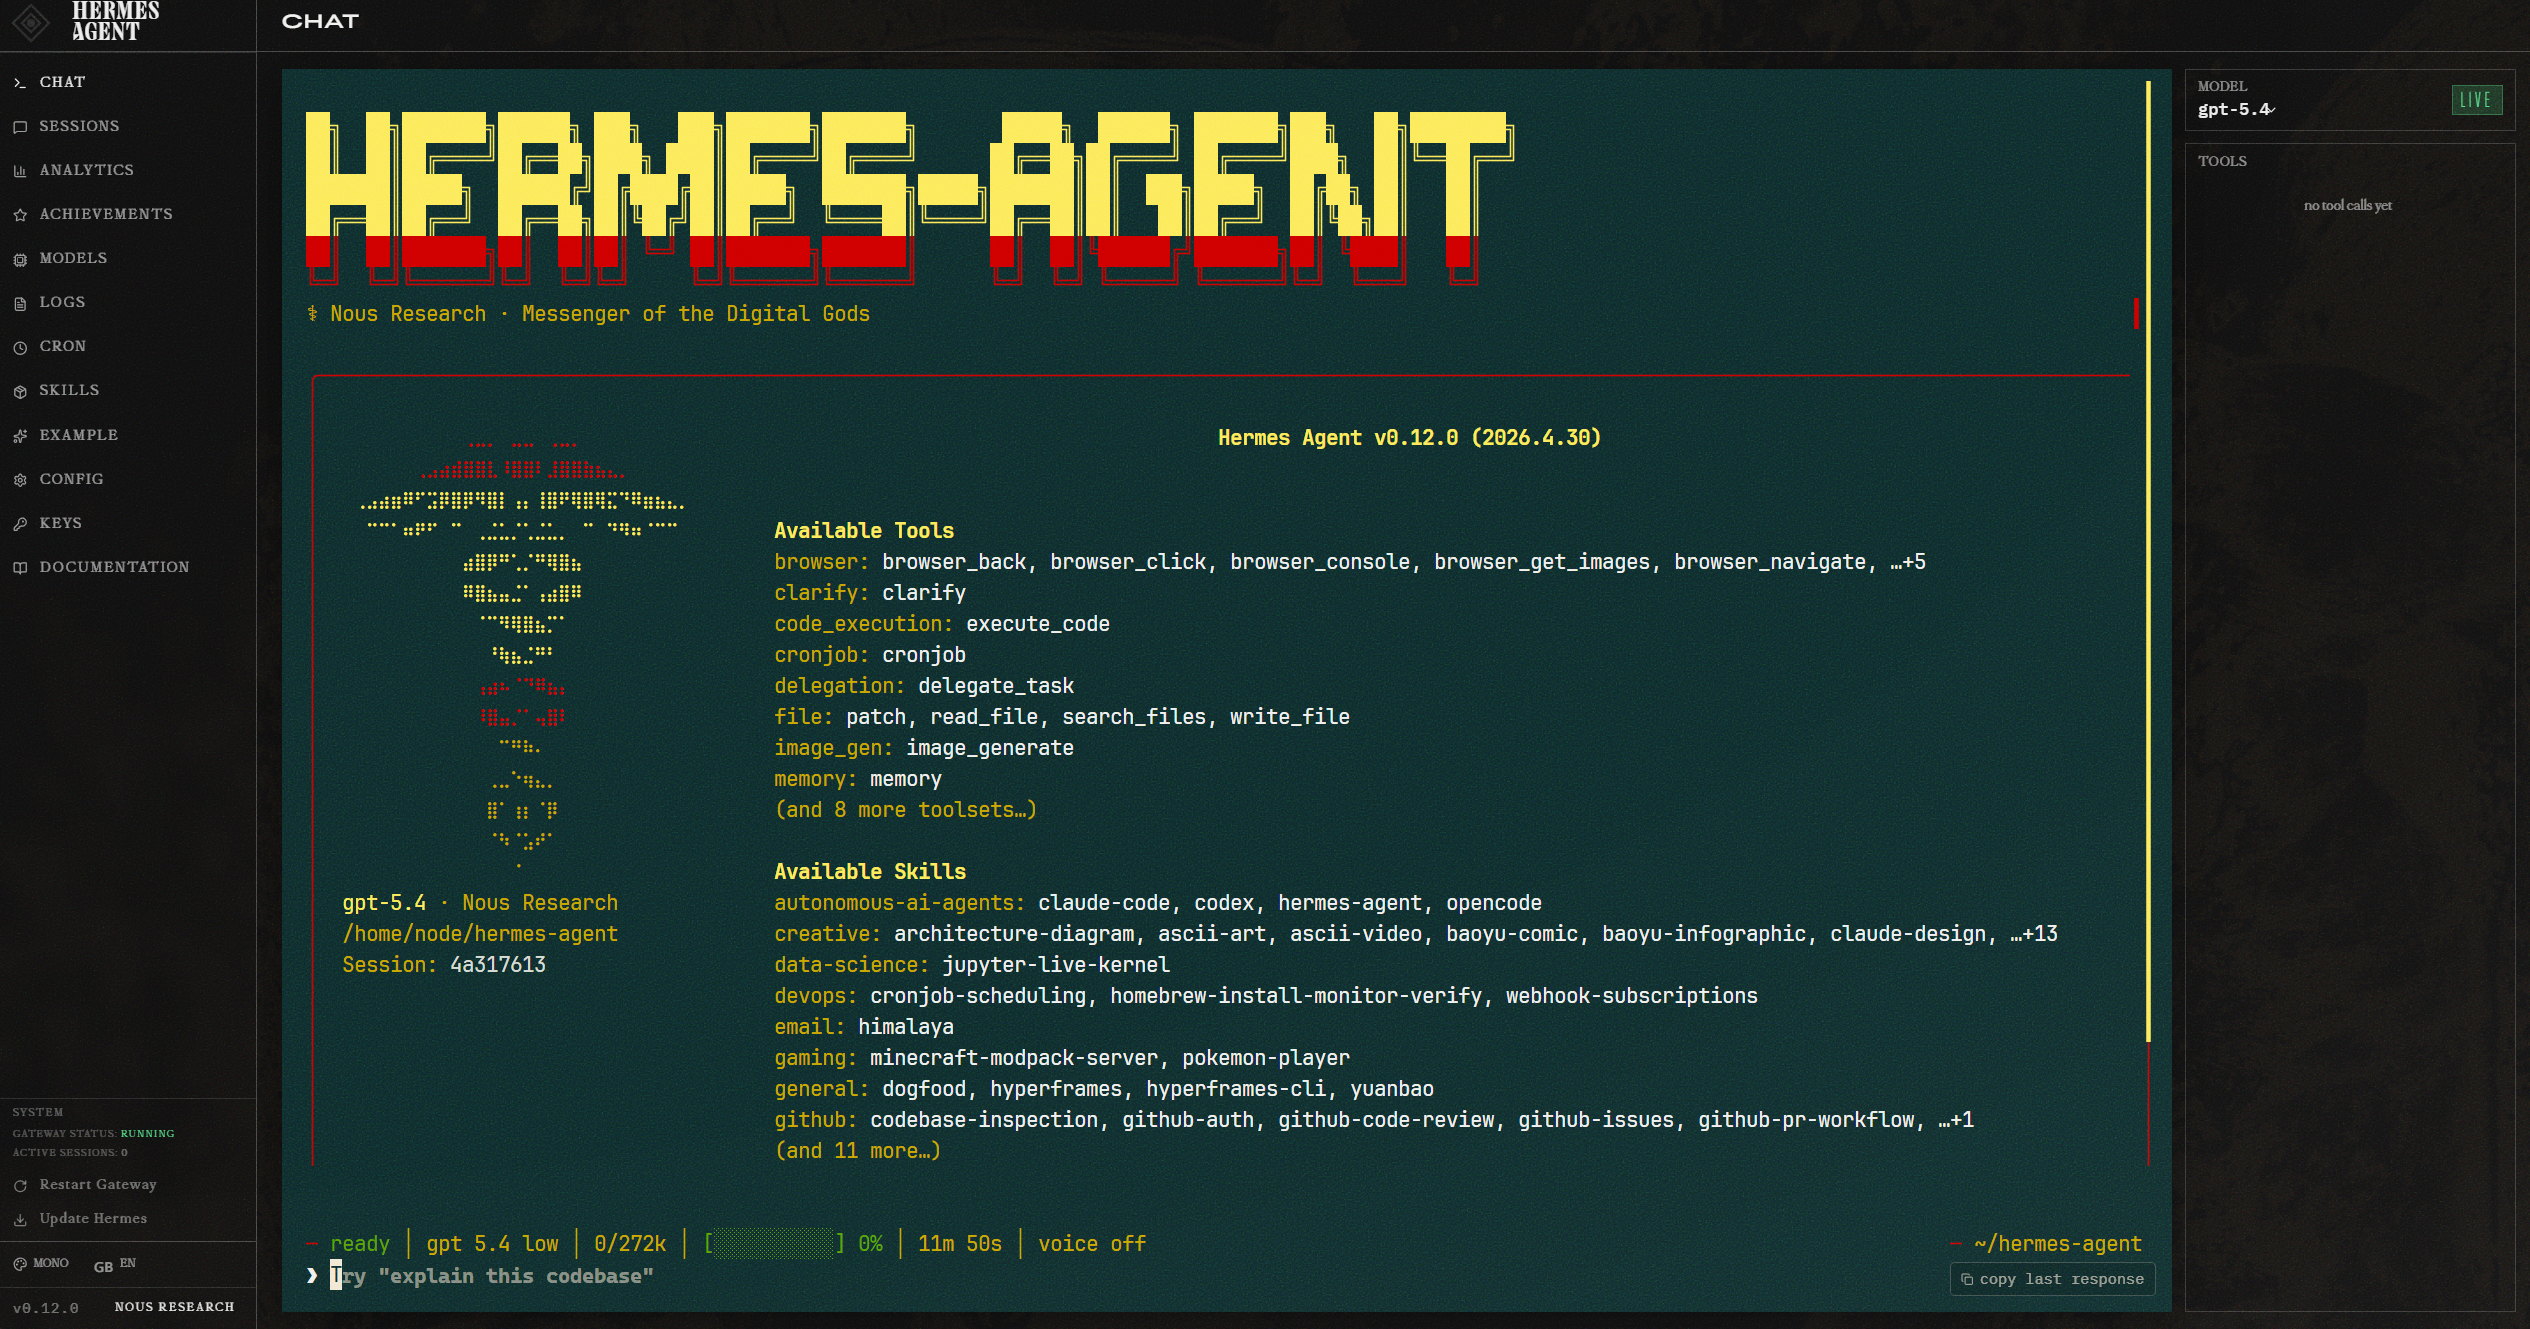
This chat uses the provider/model configured in Hermes. So, before blaming the dashboard, validate the base in the terminal:
hermes status
hermes chat -q "Answer only OK."
If the CLI responds and the dashboard does not, the problem tends to be in the web/pty extras, chosen port or dashboard process. If even the CLI does not respond, return to hermes model, hermes doctor and OpenAI Codex authentication.
Step 7: configure Telegram in Hermes Link to heading
After the CLI responds, you can connect Hermes to Telegram. Be conservative here: a Telegram bot connected to an agent with tools may have access to terminal, files and automations. Do not publish tokens, do not open access to everyone and configure an allowlist.
Create the bot in Telegram Link to heading
In Telegram, open a conversation with @BotFather and send:
/newbot
BotFather will ask for:
- a display name, such as
Hermes Agent; - a unique username ending in
bot, such asmy_hermes_bot; - at the end, it gives you the bot API token.
The token looks like this:
123456789:ABCdefGHIjklMNOpqrSTUvwxYZ
This value is secret. Treat it like a password.
Discover your numeric Telegram ID Link to heading
Hermes controls access by numeric user ID, not by @username.
The simplest path is to message @userinfobot. It replies with your ID. Another common alternative is @get_id_bot.
Save that number. It will be used as the allowlist:
123456789
Configure through the Hermes assistant Link to heading
In Ubuntu/WSL, run:
hermes gateway setup
In the assistant, select Telegram when the platform list appears. It should ask for:
- the bot token created in BotFather;
- the numeric IDs of allowed users;
- whether you want to start or restart the gateway.
If you prefer manual configuration, the Hermes documentation shows these variables in ~/.hermes/.env:
TELEGRAM_BOT_TOKEN=123456789:ABCdefGHIjklMNOpqrSTUvwxYZ
TELEGRAM_ALLOWED_USERS=123456789
For multiple users, separate by comma:
TELEGRAM_ALLOWED_USERS=123456789,987654321
Do not use GATEWAY_ALLOW_ALL_USERS=true in this tutorial. That only makes sense in very controlled scenarios; for an agent with tools, it is asking chance to sit at the keyboard.
Run the gateway in WSL Link to heading
On traditional Linux, Hermes can install and start the gateway as a service. In WSL, the command reference recommends running the gateway in foreground, because systemd support may not be reliable in every installation.
Inside Ubuntu/WSL, run:
hermes gateway run
Leave that terminal open. Then message your bot on Telegram.
If you want to keep the gateway alive without occupying your main terminal, use tmux:
sudo apt install -y tmux
tmux new -s hermes 'hermes gateway run'
To leave the session without stopping the gateway, press Ctrl+B and then D. To return:
tmux attach -t hermes
Useful commands inside Telegram Link to heading
After it is connected, you can chat normally with the bot. Some useful commands inside the chat:
/newor/reset: starts a new conversation;/status: shows session information;/provider: shows available providers;/model: switches between already configured models;/stop: interrupts the agent if it is executing something;/help: lists available commands.
Remember: /model in Telegram does not configure new OAuth. To add a new provider, return to Ubuntu/WSL and run:
hermes model
Step 8: only then think about other bots and automations Link to heading
When the first chat works, then it makes sense to explore the next resources:
hermes tools list
hermes gateway setup
hermes skills list
hermes skills browse
Important correction: hermes skills alone exists, but it is a command group. In the validated version, it only shows the correct usage and asks for a subcommand. To list installed skills, use hermes skills list; to browse available skills, use hermes skills browse or hermes skills search <term>.
Do not jump straight to Discord, Slack, WhatsApp, cron, Docker or API server before validating basic chat and Telegram. If the base does not respond, adding more layers only spreads the problem.
Common problems and fixes Link to heading
I ran the installer in PowerShell and it failed Link to heading
Run it again inside Ubuntu/WSL. The command:
curl -fsSL https://raw.githubusercontent.com/NousResearch/hermes-agent/main/scripts/install.sh | bash
is a Linux/macOS/WSL2 command. On Windows, the supported environment is WSL2.
If you do not have Ubuntu on WSL2 yet, return to the base guide: WSL2 on Windows: Linux for developers .
hermes: command not found
Link to heading
Reload the shell:
source ~/.bashrc
Or close and reopen Ubuntu. If it continues, check:
echo $PATH
Look for ~/.local/bin in the output. If it is missing, add it to ~/.bashrc:
export PATH="$HOME/.local/bin:$PATH"
Then reload:
source ~/.bashrc
Codex login does not appear or fails Link to heading
Run again:
hermes model
Choose OpenAI Codex and redo the browser flow. If the problem persists, run:
hermes doctor
It is also worth confirming whether you are using a current Hermes version:
hermes --version
To check whether there is an update without installing anything:
hermes update --check
And, when you decide to update for real, run:
hermes update
Do not treat updating as the first reaction to every error. First read the message, run hermes status and hermes doctor, and only then update if it makes sense.
The selected model is rejected Link to heading
The Hermes documentation recommends models with at least 64K context tokens for agent flows with tools. If you choose a model that is too small, Hermes may reject it or work poorly. For this tutorial, using OpenAI Codex through hermes model avoids much of that manual decision.
Telegram does not answer Link to heading
First check whether the gateway is running:
hermes gateway run
If it shows a token error, return to BotFather and confirm that you copied the full token. If it ignores your messages, confirm that your numeric ID is in TELEGRAM_ALLOWED_USERS.
Also run:
hermes doctor
And confirm that the CLI works without Telegram:
hermes chat -q "Answer only OK."
If the CLI fails, the problem is still Hermes or provider configuration. If the CLI works and Telegram does not, focus on token, allowlist or gateway.
Final checklist Link to heading
Before considering it ready, confirm:
- Ubuntu is already running on WSL2;
git --versionworks inside Ubuntu;hermes --versionworks inside Ubuntu;hermes modelwas configured with OpenAI Codex;- login happened in the browser, not by pasting a password into the terminal;
hermes statusshowsProvider: OpenAI Codex;hermes doctorshowsOpenAI Codex auth (logged in);hermes chat -q "Answer exactly: OK CODEX"receives an answer;- if you will use dashboard,
hermes dashboard --helpshows the--tuioption; - if you will use web chat,
hermes dashboard --tuiopens the Chat tab in the browser; - if you installed optional tools,
rg --versionandffmpeg -versionwork; - if you will use browser/CDP,
hermes doctordoes not show a blocking browser pending item; - if you will use Telegram,
hermes gateway setupconfigured token and allowed user; - if you will use Telegram,
hermes gateway runleaves the bot online.
If all of this passed, you have Hermes Agent installed on Windows the right way: Windows as desktop, Ubuntu/WSL2 as Linux runtime and your ChatGPT/Codex account as the main provider.
References Link to heading
- Hermes Agent - Installation
- Hermes Agent - Quickstart
- Hermes Agent - AI Providers
- Hermes Agent - Configuration
- Hermes Agent - CLI Interface
- Hermes Agent - TUI
- Hermes Agent - Web Dashboard
- Hermes Agent - CLI Commands Reference
- Hermes Agent - Messaging Gateway
- Hermes Agent - Telegram Setup
- Astral uv - Installation
- Claude Code - Authentication
- Claude Code - Legal and compliance
- OpenClaw issue - Claude Code OAuth token blocked
- OpenCode issue - Claude Code OAuth token handling
- Hermes Agent issue - Anthropic OAuth billing/provider behavior
- The Verge - Claude subscription changes for third-party tools
- OpenAI - Introducing GPT-5.5
- OpenAI - GPT-5-Codex
- OpenAI Models - GPT-5-Codex
- OpenAI Help - Billing settings in ChatGPT vs Platform
- OpenAI API Reference - Authentication